

You don’t have to be a fast fashion retailer to appreciate the speed and efficiency at which they operate. It’s amazing how quickly they get designs from the runway to the market, both online and in stores.
The best part of it all is you can learn from fast fashion when it comes to optimizing your product photography workflow. In today’s ecommerce-dominated world, streamlining your photography process is the key to getting your products to your customers as quickly as possible.
If you follow this six-step guide to optimizing yourproduct photography, you too can shoot like fast fashion. Here are the best product photography tips to help you become a pro.

Shopify Academy Course: Product Photography
Photographer Jeff Delacruz shares how you can create your own photo studio and take beautiful product photos for less than $50.
Enroll for free1. Plan your shoot
从一开始,你应该知道OB欧宝娱乐APPw the shoot day will proceed before you ever enter the studio. Get organized. Gather any materials you’ll need for your product photography shoot, research answers to any burning questions, coordinate with photographers and models, and generally make sure everyone’s on the same page.
You don’t need any super-technical project management solutions or fancy photo editing apps (yet).
What do you need? You need a call sheet and shot list.

Plan your shoot ahead of time with a shot list that you will update during the shoot.
Your shot list is a living document that list the products you’re shooting, features that need to be highlighted (like embroidery or other details your photographer may not recognize on their own), how your product will be worn (like whether it’s a laydown or on-body, and what model or mannequin will be used), and practical details, like whether you have the product on hand.
You should have the shot list available during your shoot and update it as the day progresses, to ensure you don’t forget a necessary shot.
A call sheet is a document that roughly lays out the shoot schedule, location, and crew. It gets its name from the “call times” for each member of the crew: in other words, what time each individual needs to arrive.
You don’t want to be paying a model to stand around for hours while you’re still building your set. Try to get your call sheet out a week in advance to confirm everyone’s schedule. Don't even think about the editing process quite yet, other than to take the best product photography photos you can. Editing comes later.
2. Prep your studio
Consistency is key in product photography. You want to maintain a consistent appearance from shot to shot and shoot to shoot, so document your setup thoroughly. Are you using natural light? What’s the weather going to be like if you’re shooting outside or near windows? These are all important questions to ask in the preparation phase.
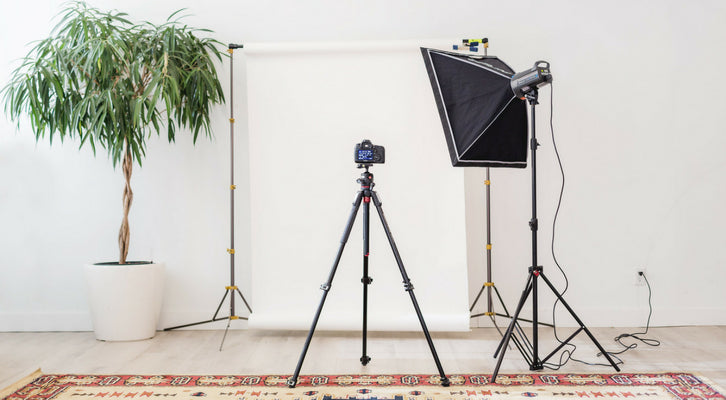
Record the position of your lights, your camera, and your products so that you can replicate your setup on future dates.

Document your studio setup so you can replicate it on future shoot dates.
If you’re building your studio from scratch, you’ll need a DSLR camera, tripod, white backdrop, foam board reflector, andlight source.
Accident-proof your studio. Coil cords and tape them down to prevent tripping. Use affordable solutions like gaffer tape, Velcro, zip ties, sandbags, and clamps to prevent expensive accidents.

事故证明你的工作室,防止昂贵的和dangerous mistakes.
3. Style your product
Make your products look their best by preparing them prior to the shoot and then styling each product between shots. Yes, photo editing plays an important part in getting the best product photography possible, but you can save yourself a lot of time and headache by styling your products well during the shoot.
Remove any tags, stickers, or other visible labels. Look for any damage that may have occurred in transit; samples can travel a lot of miles and take a rough road. Repair any damage you find.
Clean your product, repair any damages, and style it before shooting.
Iron or steam your product on the day of the shoot to prevent unsightly wrinkles. Lint rollers can quickly remove dust, string, and other unwelcome tagalongs.
Styling is much more than coming up with attractive wardrobe combinations or creative props.
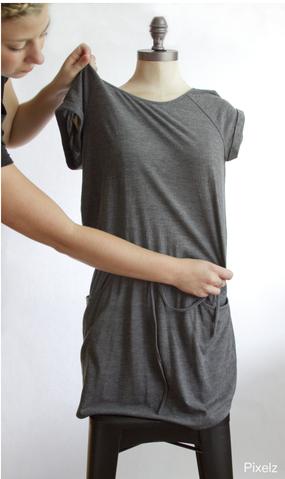
If you’reshooting apparelon a model or mannequin, use clips, pins, and garment tape to create a flattering fit. Consider hiring a professional stylist—they’ll come complete with their own kit and ideas, and allow you to manage higher-level aspects of the shoot.

The invisible mannequin or ghosting technique removes the distraction of mannequins in post-production.
If you don’t have the budget for a model and you don’t want the distraction of mannequins in your product images, you can use a 3D post-production technique called “ghosting” or the “invisible mannequin.”
If you want invisible mannequin images, you need to plan for it ahead of time so you take the proper shots. Later, you’ll combine multiple images together in post-production.
4. Capture your shot
The actual capture of your image should be fairly simple after you’ve completed preparation and setup. Proper prep will let you enjoy the moment. We’ll worry about how to optimize images later.
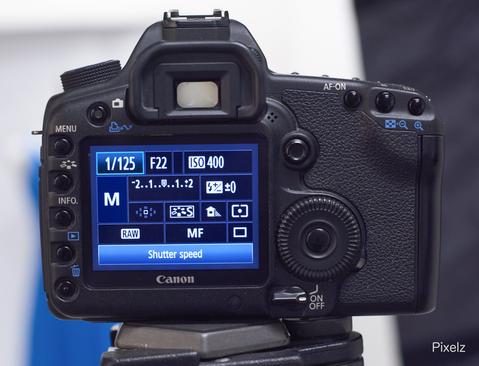
Take test shots with different camera settings. Document your final selections.
花一些时间在测试镜头和调整哟ur camera settings. If you’re not familiar with aperture, ISO, white balance, and all the other icons and acronyms on your camera, take some time to review thisDIY camera settings guide.
Use image capture software.Capture One ProandAdobe Lightroomare two powerful and popular programs that can speed up your workflow while also improving your image quality. Both will tether directly to most cameras and provide you the ability to instantly review, catalog, and adjust your images.
Capture One Pro’s annual $300 price is considerably more expensive than Adobe’s $10 a month Creative Cloud Photography plan (which bundles Photoshop and Lightroom), but both come with 30-day free trials to let you judge their value. Sony camera owners can take advantage of a lighter weightCapture One Expressoption for free for 30 days.
If you’re shooting still products or shooting flat lays, you may prefer to capture your shot directly from the computer with the press of a laptop spacebar rather than a camera button. If you’re shooting products that are in motion, like on a model, you should get behind the camera to ensure you truly see the moment. Take as many shots as you need to get a final image you're proud of.
5. Process your images
After you’ve captured your images, it’s time to process them for the web. Your basic post-production objective is to facilitate browsing and increase conversion rates through high-quality and low-bandwidth images. You needyour pages to load fast, but without compromising resolution.

Use consistent alignments, margins, backgrounds, shadows, and other elements in your product images.
Consistency is quality when it comes to product images. You want to use the same background, same margins, same alignment, same shadowing, and other common properties across your imagery. Consistency keeps customer focus on the products rather than on irrelevant distractions like changing backgrounds. And consistency speaks to your attention to detail, which increases your professionalism in the eyes of your customers.
Post-production can be broken into two phases: batch and individual processing. Batch processing is when you adjust all your images at once, and can often be done with your image-capturing software. You can do things like color adjustment in Lightroom for your images in bulk, preventing repetitive and time-consuming edits.
While you can usefree photo editing software, Adobe Photoshop allows you to perform some more sophisticated batch processing through the use of Photoshop Actions. Actions allow you to record a sequence of steps and turn them into an automated process you can then perform on all similar images at once. It’s great for adjustments like exposure, contrast, hue, and resizing. The more you can streamline your photo editing process the better. Individually editing several photos isn’t a big deal, but if you have to edit hundreds, that’s going to add up.
Some steps must be done manually for each individual image. For example, you probably want to cut out the original background of your image and replace it with pure white.
A white background eliminates distractions while also reducing file size, because white backgrounds have less detail to save. Even the most skilled image editor may need a couple of minutes toremove the backgroundfrom an image while maintaining professional quality.
Consider outsourcing post-production. Digital processes are among the most advantageous to outsource, because there’s no physical handoff required, there’s a global pool of skilled labor, and quick turnaround times are often available. The biggest challenges in outsourcing are management, communication, and ensuring your quality standards are met.
Outsourcing post-production can save you time and money if you find the right partner.
If you are looking for an outsourced image editing partner, you should consider more than just pricing. Check reviews and previous work to be sure they can achieve the quality you need. Look to see if they are socially responsible, easy to communicate with (language, time zone, support hours, phone availability, etc.), and able to scale with your needs.
6. Review and publish
Whether you outsource oredit your images in-house, they should be reviewed by another person for both content and compliance with technical specifications. Creating high-quality photos is a true team effort.
If you are both the editor and reviewer, you may see what you expect to see rather than what’s actually there. A fresh set of eyes in the review process can spare you embarrassment and frustrating rollbacks down the line.
Once you’re certain your product images are ready for your online store, it’s time to add them to your Shopify.
If you’re going directly through your Shopify account, you can add product images while adding a product, and later add variant images.
Predictable workflow, predictable quality
Once you have created, documented, and run through your workflow, do it again! Tweak it as needed and you’ll get faster and faster. Soon you’ll be a finely tuned machine, humming along.
Operating an efficient photography workflow isn’t about budget, it’s about planning and awareness. By following the above product photography tips you can streamline and perfect your workflow.
Pay attention to industry trends and follow industry leaders. Keep an eye out for new techniques, and experiment with new technology. If you’re educated and organized, you can produce as fast as anyone in the business.
About the author:Thomas Kragelund is the CEO and founder ofPixelz, a leading product image solutions partner for internet retailers, designers, photographers and webmasters worldwide.
Product photography workflow FAQ
What are the 6 steps to a product photography workflow?
- Plan your shoot.
- Prep your studio.
- Style your product.
- Capture your shot.
- Process your images.
- Review and publish.
What does product photography include?
Product photography refers to the process of capturing, styling, editing, and shooting photos of products to be sold in a retail store or online. Product photography plays a critical role in ecommerce.
How do I organize my product photography?
成功的产品摄影来做wn to having a plan and doing your best to stick to the plan. This involves prepping way in advance of the shoot, staying organized, knowing what type of shots you want to take, and using the right tools before, during, and after a shoot.