

Your product images can make or break the success ofyour jewelry business.
If shoppers can’t see detailed jewelry images on your website, how else will you convince them to buy?
Photographing jewelry is a challenge. You need to avoid reflections and smudges, manipulate lighting, and set your camera’s shutter speed and aperture to capture the jewelry in a flattering way.
This guide will walk you through tips on lighting, positioning, and editing photos—so it looks like you hired a professional.
Table of Contents
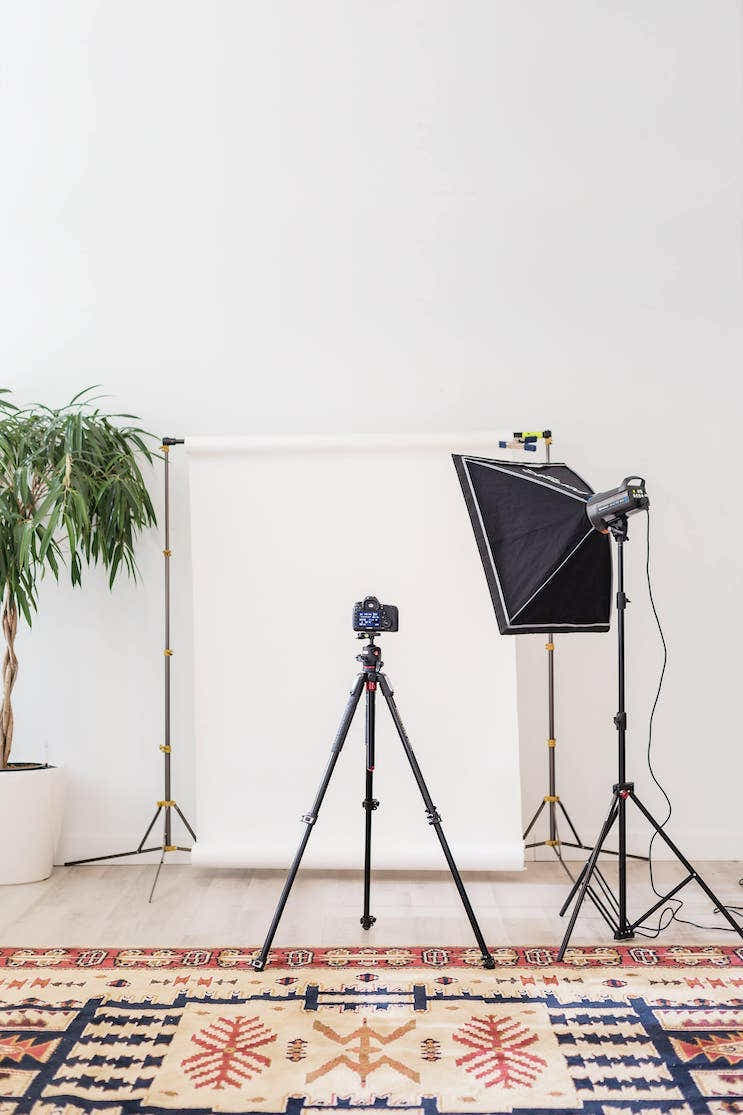
Jewelry photography equipment
The photography equipment you use will depend on your budget. You can keep costs minimal if you buy a few of the items below. Or you can buy more expensive gear like lighting or displays for your jewelry.
Here are some of the pieces of basic jewelry photography equipment you’ll want to have:
Camera
You don’t need an expensive camera to take photos of your jewelry. New jewelry store owners can use an iPhone or Android, too. If you have a smartphone handy, use it. If you already own a DSLR with a nice camera lens, you can use that.
Tripod
If you take freehand photos, it won’t matter what lighting setup you use. Holding your camera or智能手机with your hand will often result in camera shake.
Always use a tripod. Tripods are cheap, effective, and improve both quality and consistency. When your camera is held steady by a tripod, you can use optimal aperture and ISO settings. Mark a spot on the floor for your tripod and it will be easy to replicate your setup, even when photographing on different days.
Lighting
Light is necessary to take photos of your jewelry. A room with windows next to a wall is a good option. The bigger the window, the more light you’ll get. If you don’t have natural lighting, you could buy artificial light sources, like a softbox.
You can find photography lighting kits online. Keep your setup simple at first. After you’re familiar with the camera, you can try different lighting tactics, such as reflectors and LED lights.
Get your free Photography Brief Template
Plan and create every product photo your ecommerce store needs to sell products and stand out from the competition. Boost your sales and build your brand with beautiful product photography using our Photography Brief Template.
Learn MoreTable
A standard folding table works best. Look for one with a width between 24 and 27 inches.
White background
There are different ways to create a white background for your images. If you plan to take a lot of different photos, consider buying a white paper sweep.

纸扫cre大卷纸使用ate a white or colored background. If the sweep gets dirty, simply cut the dirty piece off and roll out a clean section. An alternative to sweeps is poster board.
Foam boards
Whenphotographing your products, there will be a shadow side opposite the side of the product that your light hits directly. It’s usually too dark. But you can place a white foam board to reflect light back into the shadow side to brighten it.

Clamps or tape
You’ll want tape or clamps to keep your foam boards and sweeps in place when using a table.


Free Guide: DIY Product Photography
学习how to take beautiful product photos on a budget with our free, comprehensive video guide.
Get our DIY Guide to Beautiful Product Photography delivered right to your inbox.
Almost there: please enter your email below to gain instant access.
We'll also send you updates on new educational guides and success stories from the Shopify newsletter. We hate SPAM and promise to keep your email address safe.
How to photograph jewelry
Now that you’ve got your gear, let’s walk through how to photograph your jewelry and get it ready to showcase in your ecommerce store.
- 设置表
- Position your lighting
- Style your jewelry
- Prepare your jewelry
- Set your camera
- Take the photo
- Retouch and finalize
1.设置表
Find the space you want to use as your photo studio. If you’re near a window, set up your table 90 degrees to the right or left of it. The closer you are to the window, the softer the light will be.

Once your table is placed, you’ll want to set up your sweep. There are different ways to do this, but the goal is to have your sweep vertical. If you’re next to a wall, you can tape your sweep to it. If you’re not, you’ll need to make a stand or surface to which you can secure the back of your sweep.
Place your tripod in front of your setup. If you’re using a smartphone with a short tripod, you can place it directly on the sweep. You should have enough space for your jewelry if you’re using a large enough table.
2. Position your lighting
If you’rephotographing with natural light, you’re already set with lighting from your window.
But if you’re using artificial lighting, your setup will look a little different.
Place one light source and softbox or umbrella at a 45-degree angle to the product. This will keep the lighting soft and even. Keep your camera directly in front of the jewelry piece. If your product is placed near the back of your sweep, you may see some shadow. Move the product closer to you to get a white background.
Free Guide: DIY Product Photography
学习how to take beautiful product photos on a budget with our free, comprehensive video guide.
Get our DIY Guide to Beautiful Product Photography delivered right to your inbox.
Almost there: please enter your email below to gain instant access.
We'll also send you updates on new educational guides and success stories from the Shopify newsletter. We hate SPAM and promise to keep your email address safe.
3. Style your jewelry
If you’re new to jewelry photography, starting with a white background can help you establish a standard. Once you get more experience, you can add variables to your staging.
To make your photos more interesting, place your jewelry on props or in front of alternative backgrounds, such as:
- A marble slab background
- Simple textured backgrounds
- Ring holders or stands
- Group photos with other pieces of jewelry

You can also use models to show what your jewelry looks like when someone wears it.Aether, for example, uses a mix of plain white backgrounds and models to promote its diamond jewelry.

Styling really comes down to how you want to present your products. There’s no one way to do it. Start simple, then add and test different things over time.
4. Prepare your jewelry
自不待言,但你的珠宝要d be clean and polished because of the high level of detail captured by a DSLR camera and proper lighting setup. The final image will often be blown up several times the jewelry’s actual size. Details invisible to your naked eye will be revealed when photographed.
Once polished, place your jewelry in the center of the flat part of the sweep. Leave some room to sneak your white reflector card in later.
Wipe down your jewelry every time you touch it. Wearing cotton gloves may save you time and reshoots.
5. Set your camera
Don’t take artsy low-aperture photos of your jewelry that focus on only one part of the product. High aperture, full-focus photography will create a sharp image yourcustomers trust.
Your customers want to see every detail. Give it to them with aperture settings of f/11 or greater, and set your ISO as low as possible—preferably ISO 100.
Ensure your white balance is set accurately so you capture your jewelry with your desired colors. Either set it manually or use your camera’s automatic mode and double check the results.
6. Take the photo
Position your camera on its tripod so your lens points slightly down at the product. Position your lights (with diffusing umbrellas) above your product on either side, angle each down at the product, and set them to the same power. This setup should fill the frame with even light without creating ugly bright spots on your product.
7. Retouch and finalize
After taking your pictures, you’ll want to prepare the images for your online store. Post-production processing involves making photos look professional and beautiful.
The easiest route is to hire a professional editor to retouch your images. This can save you time and money if you’re learning how to edit photos from scratch.
If you prefer to do it yourself, choose afree online photo editorand learn thephoto editing basics. The basic photo editing techniques available are enough to help you enhance your photos and make them shareable across all your marketing and sales channels.
Reach customers everywhere they are with Shopify
Shopify comes with powerful tools that help you promote and sell products on Facebook, Instagram, TikTok, Google, and YouTube from one back office. Make sales on multiple channels and manage everything from Shopify.
Explore Shopify’s sales channelsJewelry photography on phones
Remember, you don’t need a DSLR camera to take product photos of your jewelry. You cantake product photos with your smartphone, as long as it’s a modern one with a decent camera.
Here are some things to keep in mind when taking jewelry photography on your smartphone:
Use a mini tripod
Just like with a DSLR camera, you’ll want a smartphone-compatible tripod to keep the camera steady and photos consistent.
Check out portrait mode
Portrait mode can help you focus in on the jewelry details and automatically blur the rest of the image.
Use the rear-facing camera
Most smartphones have a front-facing, or selfie, camera with fewer megapixels than the rear-facing camera.
Get the right white balance and exposure
On some smartphones you may be able to set the white balance and exposure before you capture your image. On others, the settings could be altered when editing the photo.
Lock your camera settings
Once you’ve nailed your settings, lock them in place. This will prevent the camera from adjusting the settings when you take more photos, allowing you to capture consistent jewelry product photos.
Jewelry photography tips
Whether you’re a newjewelry businessor working on your fifth store, keep the following jewelry photography tips in mind:
Take consistent photos
Consistency is key when it comes to the product photos on your website. They should be staged and photographed similarly to create a cohesive experience for online shoppers.

Develop aphotography style guidefor your jewelry photography and follow it. Consistency is key inecommerce photographyand variations from product to product or photo to photo will distract your customers. Document everything: camera settings, lighting, background, and equipment position. Make sure you can resume taking pictures on a different day without any noticeable changes.

Take photos from different angles
It’s satisfying to click on a product on a category page and find there are more images of it on the product page. The diverse images can help answer shoppers’ questions or reveal details that make your products stand out.
You’ve prepped your product, lighting, and camera: Don’t stop at one or two images. Build trust by showcasing every aspect of your jewelry. More images lead to more sales, so capture as many angles of your product as possible.

Retouch your photos
Few things kill a sale as quickly as a bad Photoshop job. Poorly retouched photos feel fake and destroy a customer’s trust in the product image, and therefore in the product. Either invest the time to become skilled in photo editing software or hire a professional.
Common photo edits you’ll need to make include:
- Correcting colors with hue and saturation
- Sharpening to bring out details
- Adding a drop shadow to give white background images dimension
- Retouching unintentional lighting or glares and other imperfections such as scratches or dust
- Manipulating exposure and white balance to create a realistic look

In addition to retouching, you should create templates that consistently crop, set margins, and align your product images. Remember: consistency is key.
If you don’t have the time or skills to fix your images, consider hiring a post-production processing company.
Common mistakes to avoid
Many merchants fall victim to some common jewelry photography mistakes. Knowing what they are can help you avoid the same pitfalls.
Too many reflections
You want your customers to look at your jewelry without the distraction of a reflection. They might wonder if a reflection is the photographer mirrored in the jewelry or a flaw in the product.
The presence of gemstones and metal creates a technical challenge for jewelry product photography. It’s difficult to capture highly reflective objects without distracting reflections. Follow this guide tophotographing reflective productsand try a double overhead light for metallic jewelry.

太有创意的背景
Some inexperienced retailers look at a white background and think “boring,” or “missed opportunity for branding.” They try to differentiate themselves with colorful, active backgrounds. That’s a mistake.
There’s a reason Amazon, eBay, and many other marketplaces require or recommend a white or neutral background. A plain white or light gray background keeps the focus where it should be: on your product.
White backdrops are cheap and easy to create, and you can easilyedit out the background of your photos. You can use seamless white paper, create a lightbox, and even photograph white products on white backgrounds. If your stand-in background has blemishes or anything else you need to fix, you can also use free photo editing software to fine-tune it during post-processing.
Black is also popular in jewelry photography, but, be aware, you may have difficulty submitting black-background images to some marketplaces. They might work better for your own Shopify store.
Distracting with too many props
Distracting with too many props is a mistake based on the same “keep your focus” principle we discussed earlier. Props are a distraction you may not need.
Most props draw attention away from your product. There are times where it’s appropriate to use stylish props, models, and interesting locations in images that include your product. Those are editorial images meant for branding. They belong on magazine covers, as hero images on websites, and as banners in emails. They don’t belong on product pages.
Remember, when it comes to your website, you want your jewelry photography to be consistent and focused on your product. Most props create inconsistency and distraction.

Free: Shopify Store Trust Checklist
Shopify’s research team conducted a series of in-depth interviews with North American shoppers to learn how customer trust is formed in online stores. This checklist is a summary of their findings, created to help business owners understand what essential aspects of their online store experience creates trust among customers, along with the trust-busting mistakes to avoid.

Get the checklist delivered right to your inbox.
Almost there: please enter your email below to gain instant access.
We'll also send you updates on new educational guides and success stories from the Shopify newsletter. We hate SPAM and promise to keep your email address safe.
Start taking beautiful jewelry photos today
The best online jewelry stores all have one thing in common: gorgeous product photos. By following this tutorial, you’ll create compelling images that sell andbuild your brand. As you gain experience shooting jewelry photography, you can add in elements to your shoots and get creative with your images.
By investing in high-quality photos and showcasing your jewelry the right way, you’ll soon see the benefits through higher sales and revenue.
Ready to create your business? Start your free trial of Shopify—no credit card required.
Photographing jewelry FAQ
What is the best way to photograph jewelry?
How do you photograph jewelry at home?
- 设置表and sweep.
- Position your lighting.
- Style your jewelry.
- Prepare your jewelry.
- Set your camera.
- Take the photo.
- Retouch and finalize.